 |
| The rear apron cut off |
 |
| Some rust treatment |
Well after purchasing the bus we decided to get in a heavy haulage tow truck for the delivery home, as we thought it wasn't quite roadworthy for the drive, even though we would of had good air con, lol. In saying this the old girl starts first time every time and is mechanically good. Any how we started with a rust treatment on one side of the bus and left the areas that needed replacing as can be seen in the pics. The remaining sheeting and carpet were taken down as well as the original front door,
once at this stage we decided on removing the complete rear end as the rust had really settled in around this area, easier to start again, so out came the blow torch and now then was no rear end. At this point i was able to remove the air con hoses from the engine bay area, still have the original roof mounted unit to remove at a later stage. We have kept the original rear apron and will use this again once the frame work is complete, which we have started, we started with the rear engine bay frame as in pics with the apron just sitting in place as a guide. We are using 50x50 shs as the original frame is and was that size, we will use a smaller shs to frame in around the engine bay that will form part of our floor in the bedroom area. Now with this section started we decided to start making replacement frames for the rear side sections which have been precisely measured to fit once the old part is cut out with either the nine inch grinder or the gas torch, but with saying this we also have to wait for the appropriate weather as we haven't got a big enough shed for our bus, so he are forced to work outside which
 |
| Engine door frame in |
 |
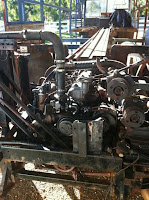
| The trusty 6BD1 Isuzu motor |
 |
| New section ready to go in |
is really dry at the moment, so we have to be really care full not to start a fire, roll on the cooler months where we can get right into it. Once the rear sides are tacked into place we will be able to finish of the rear frame work and then re panel the rear end, we have chosen aluminium composite panels for the exterior of the bus, it is very good on price but is extremely light and strong, we will also fill in the old window area as we won't need any windows in this area, we have agreed on having a wardrobe and drawers in the rear section over the engine area and with the queen bed being a slide out should create plenty of room in the bedroom area. Once the rear end is complete we'll be starting down the drivers side with most of the rusted sections being right where the two slide outs are going, hmmm this makes it slightly easier. Well for now i'll leave it at that until the next work out on the rear of the Corona Express.


Hello,
ReplyDeleteI came to your blog and have been reading along your posts. I decided I will leave my first comment.
Hello, im glad you have been enjoying my site, I haven't been working on the project for the last two weeks, due to family members being sick, but stay tuned for some more conversion work to come shortly. Kind regards Andrew.
Delete