 |
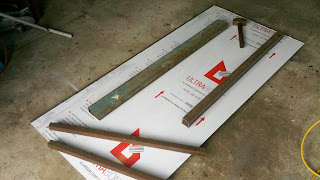
| A.C.P weighted down with objects |
Well as you are aware, we had fabricated the frame work whilst awaiting the adhesive on the rear apron to set. So I don't have any pictures of this part even though it is basically a square frame and is measured to fit the rear recess that accesses the engine bay. I did how ever welded in some supports where the two locking handles were to be fitted, these locking handles and the gas struts were purchased through eBay and at a good price, the piano hinge was sourced through the local hardware store. Once I had the main frame welded up and checked for square (very important) I then did some prep work on the welds, like grinding them flat where the A.C.P was to be secured, again I use sikaflex to secure it down and used objects to apply even weight all over the
panel. I left this to set over night as it was getting late and I have to keep the wife happy too, after all if it wasn't for her looking after our four young children whilst I work on our project then I don't think I'd be able to do it, especially with a full time job with sixty plus hours a week. It had fully set over night and I was then able to secure the piano hinge, I used rivets for this and it had turned out pretty good.
 |
| Piano hinge fitted |
 |
| Test fitting handles |
 |
| Ready for the install |
 |
| In position with clamps |
The next step was to cut out the required hole for the locking handles, please keep in mind that you don't want to over cut the holes as this would look pretty ugly, so I cut out a bit of cardboard to use as a stencil and made sure it was precise. Once I had this stencil I traced around it at the desired areas where the handles were to be fitted, at this stage I used a big enough drill bit to fit my jig saw bit in and drilled holes on the inside of the template lines at every corner, this allows you to just cut straight lines with the jigsaw. I cut these holes and then test fitted the handles, because I was being careful not to over cut I had to trim another couple of millimeters off one side of the template to fit the handles, perfect fit, we used alloy rivets to secure these down and it looks great. I still had to install the gas struts and the brackets etc which is pretty easy with a bit of flat bar welded on with a allocating hole, once at this stage I test fitted the item with clamps and then proceeded to rivet the other side of the piano hinge to the main frame work with only three rivets so I could then test for location and squareness, once happy I riveted the rest of the hinge. We still required some brackets on the main frame work for the gas struts, we used some angle iron for this procedure, it worked well but at this stage I had realized that I had insufficient gas struts, so I will eventually use these on a smaller side door in the future and order some to replace these, they just do the job but slowly drop. Some stops were
 |
| Door hanging and top L.E.D lights fitted |
 |
| 505mm gas struts |
in order to stop the door at the required spot, I welded in a couple of pieces of flat bar with a hole drilled out for a rubber stop to be inserted in the near future. Whilst I still had the ladders and power cords floating around before packing up, I decided we had enough time to measure the required locations for the led lights that I picked up for a steal via eBay, I just kept placing the lowest bid on these items and kept losing the bids, but I knew if you kept doing this then one day you would win them on the cheap which is what happened. Any how I measured the area and started to install the lights with the help of my youngest son, they love holding screws etc and passing them to you, great fun. These lights will eventually be taken down again once all the wiring has been fitted and mainly for when we are ready to lay some paint down. We are now just waiting to repair or even make a new bumper,finish off the corners, order a custom vent and fit our led lights we have for the lower section of the rig. We have opted for led lights all around the rig for the convenience of no globes and less power to run these girls, as well as looking good too. Well hope you enjoyed another read from the Corona Express.
Take care.


No comments:
Post a Comment